VPN stands for Virtual Private Network, a technology used by internet users and corporations to encrypt and secure their data on the internet, especially when connected to public WiFi networks and hotspots, such as those found in airports, hotels, cafes, libraries, etc. Moreover, a VPN is also used to anonymise a person’s identity online to bypass geo-restrictions on the web. This is because VPNs hide your original IP address and replace it with a fake IP from an entirely different location based on your selection from a list of severs to be able to access restricted web content.
In this guide, we will show you how to manually set-up a VPN connection on Windows 8 and also how to delete it. Scroll down for more details.
Creating VPN Connection on Windows 8 from Desktop
1- From the bottom right-side of your task bar, right-click on the “Network” icon.
2- Click on “Network and Sharing Center” to open.
3- Click on “Change your networking settings”, and then click “Set up a new connection or network”.
4- A wizard will open. Select “Choose a connection option”, and then click “Connect to a work place”, and then click “Next”.
5- Go to “How do you want to connect”, and then click “Use my internet connection (VPN)”.
6- You might be prompted by the wizard with a message asking if you want to set up an internet connection. In this case, you can select “set up now” or “postpone until later“.
7- From the Internet Address tab, go to Type the Internet address to connect to and insert the IP address of the server of your VPN to which you want to connect.
8- In the Destination name field, insert a name for your VPN connection, such as: name of your organisation, your name, etc. Moreover, make sure to check any boxes you find suitable for your VPN connection.

9- Click “Create” to create your VPN connection. Once you’ve done this, the Networks side bar will open for you to view all network connection installed on your computer.
Congratulations! You have successfully created a VPN connection on your Windows 8. Now, the best and most efficient way to access your newly configured VPN connection on Windows 8 is by clicking on the network icon on the system tray.
Deleting VPN Connection on Windows 8
In order to delete a VPN connection on Windows 8, please follow the steps below:
1- Go to “Star” menu.
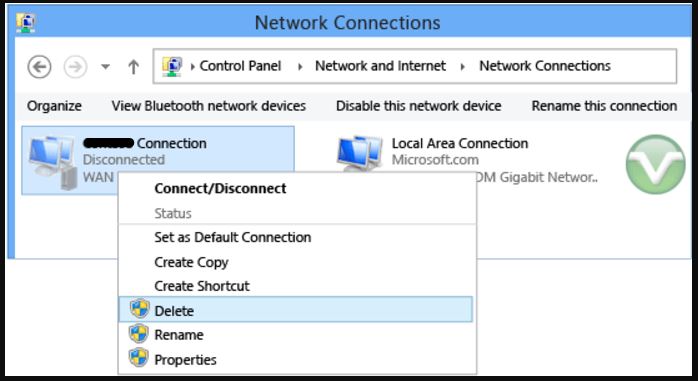
2- Type “VPN” in the “Search” bar in Charms.
3- Next, Under “Settings” click on “View Network Connections”.

4- Right-click on the VPN connection, and then click on Delete.
Congratulations! You have successfully deleted your VPN connection on Windows 8.