
Not all VPN services offer generous simultaneous connections to their subscribers. Simultaneous connections are ideal for running your VPN connection on multiple devices, such as: desktops, laptops, smartphones, tablets, gaming consoles, etc. A Tomato router can help you run your VPN connection on any device in your household, which is more efficient.
Configuring OpenVPN on Tomato-based Router
In this section, we will show you how to configure OpenVPN on Tomato-based routers step-by-step with pictures. It is important to have admin access to your computer to be able to carry out the following steps:
I) Setting things up
1- Log into your Tomato router and provide your admin username and password.
2- From the VPN menu, click on “OpenVPN Client“.
3- You can choose between Client 1 and Client 2 from the menu tabs as you prefer.
II) Importing OpenVPN Configuration files
Your VPN provider will provide you with the OpenVPN configuration files for download. We will use bVPN as an example for a VPN service provider.
1- Go to this link: https://www.bvpn.com/en/accounts/profile/openvpn_server_list/
2- Select the server you want to connect to (e.g: Germany).
3- Click on “Generate“.
III) The Configuration Process
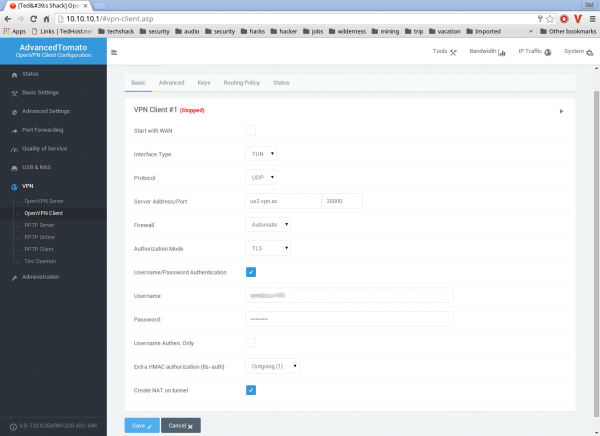
After importing the OpenVPN configuration files and successfully configuring them on your computer, Click on “Basic” tab. As you may have notices, the Basic tab contains a lot of options which we are going to explain and help you tweak:
1- WAN
It helps you to connect automatically to your OpenVPN server whenever you are connected to the internet through a WAN device. By enabling this feature, you will have all of your traffic connected to the VPN connection.
2- Interface Type
TUN devices are commonly used by most OpenVPN clients, however, some VPN services use TAP devices. In this case, you need to make sure which network device is used by checking your configuration file. If you find a line saying “dev tun“, then you need to select TUN. On the other hand, if you see a line that says “dev tap“, then you need to select TAP device from the drop down menu. This is important because the network device (TAP/TUN) has to match that of your VPN server.
3- Protocol
UDP is known for its efficiency and the most used protocol. On the other hand, sometimes TCP works better. In order to make sure, you can check the configuration file for “proto” or “remote“, and it should look like this: “remote server.vpn.net 1194 udp”.
4- Server Port/Address
The default port for OpenVPN is 1194 in case you cannot find the port in your configuration file. Meanwhile, for the OpenVPN server, an FQDN or an IP address will be needed.
5- Firewall
Make sure that it is set to “Automatic“.
6- Authorisation Mode
Make sure that it is set to TLS.
7- Username & Password Authentication
Once you check on that box, you will be requested to provide your VPN username and password.
Now that we have understood and tweaked the options in the Basic tab, let’s continue configuring your OpenVPN.
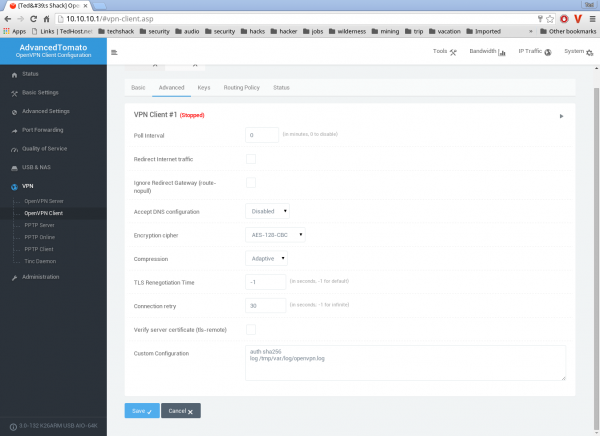
8- Click on the “Advanced” tab, and then tweak the options in it as follows:
9- Set the “Poll Interval” to 0 to disable it to prevent it from monitoring your VPN session.
10- Make sure that the “Redirect Internet Traffic” option is disabled (unchecked).
11- Set the “Accept DNS Configuration” option to “disabled“. This is important if you want to stop any DNS leaks.
12- Make sure that the “Encryption Cipher” options matches that of your VPN’s server. Most VPN service providers rely on AES cipher encryption as it is very strong. Therefore, check your configuration file to find out what cipher is used.
13- Set the “TLS Renegotiation Time” to “-1” which is 3600 by default.
14- Make sure that “Verify server certificate” (tls-remote) is not checked.
15- In the “Custom Configuration” field, you can add in any custom OpenVPN config. For example, you can set the “log” directive so that you can send the logging of the OpenVPN client to its file.
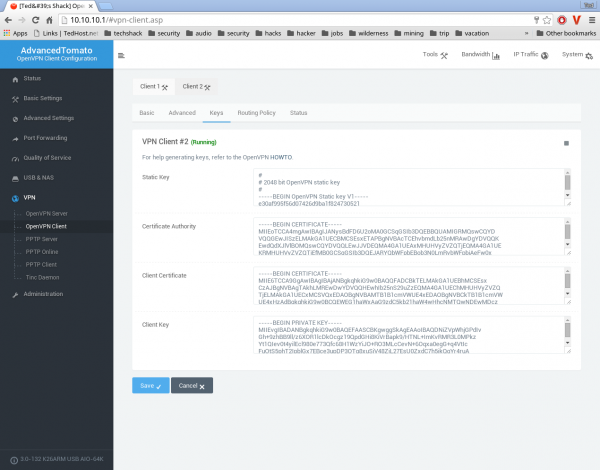
We are now done with our adjustments in the “Advanced” tab, let’s now move on to the “Keys” tab.
1- Find the static key, which is either attached separately to your OpenVPN config. file or embedded with in it and paste it into the “Static Key” field. It should look like this: ” —–BEGIN OpenVPN Static key V1—– “.
2- Copy/cut and paste your root certificate into the “Certificate Authority” field.
3- Cut/copy and paste the client keys located in your OpenVPN configuration files (cert file , key file) into the “Client Keys” field.
4- Click “Save” to store all the changes that you have made.
IV) Test the OpenVPN Connection
1- Go to the “Status” tab in your Tomato router, and then click on the “play” icon to connect to the VPN.
2- In order to make sure that your are using your VPN’s IP address, you can test your IP address using an IP lookup.