Virtual private network, VPN for short, is a network technology that is developed to encrypt an internet user’s data traffic on the internet, such as: browsing activities, online transactions, email exchange or any activity that could compromise a user’s sensitive information on the internet. Moreover, VPNs allow users to bypass geo-restrictions to be able to unblock and access any geographically restricted web content. This is because VPNs operate by concealing a user’s original IP address and replacing it with a fake IP selected by the user from a list of server locations provided by the VPN service provider. In this guide, we will show you how to manually configure a VPN connection on Windows 7.
There are 2 main methods in order to successfully configure a VPN connection on your Windows 7 system. The first is called “Outgoing”, which is commonly used by most internet users to set-up a remote computer for work purposes. The second one is for a more personal use, called “Incoming” to allow secure internet connections from other computers.
How to Create an Outgoing VPN Connection on Windows 7
1- Click on the “Start” button, and then type “VPN” in the search bar.
2- Select “Set up a virtual private network (VPN) connection”.
3- Type in the IP address or the domain name of the server you want to connect to.
4- You can choose “Don’t connect now“, if you only want to set up a VPN connection. Click “Next“.
5- Type in your username and password as shown below, and then click “Connect“.
6- On the bottom-right side of your screen, click on the network icon and click on “Connect” under VPN connection.
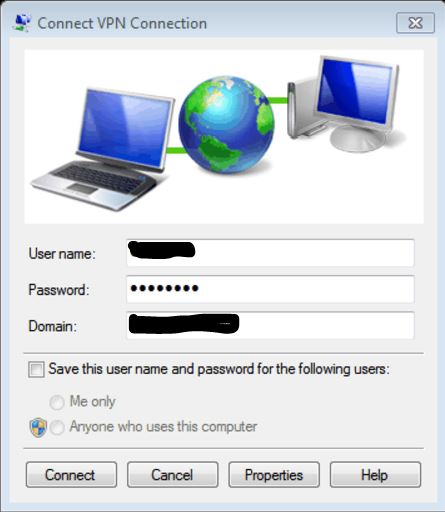
7- Enter the correct domain and your log-in credentials in the “Connect VPN” connection box.
8- Click “Connect“.

How to Build an Incoming VPN Connection on Windows 7
1- From the “Start” menu go to “Control Panel“, and then click on “Network and Sharing Center“.
2- Click on “Change Adapter Settings” on the left side of the window.
3- Click on “File”, and then select “New Incoming Connection”.
4- You choose more than one user to connect to the VPN connection.
5- Click “Next” followed by a click on “Through the Internet”, and then click “Next” one more time.
6- In this step, you can select the Internet Protocol you want to use noting that TCP/IPv4 is set by default.
7- Click on “Allow Access”.
Congratulations! You have successfully set-up an incoming VPN connection.


