Windows 8 now is one of the most popular personal computer operating system in the world, since October 2012 till this moment, there are more than 60 million users upgraded their Windows XP, Vista, 7 to Windows 8. Microsoft added various features to Windows 8, beside the traditional start menu; you will find another one, which opens in full screen and full of your apps.
Why would you need to know how to setup L2TP VPN on Windows 8
If you have blocked websites in your country and want to unblock it, so you need to know how to setup L2TP VPN on windows 8
And if you want to get a new IP address, so learn how to setup L2TP VPN on windows 8.
If you want to access your work network at home, you should use a VPN service and learn how to setup L2TP VPN on windows 8.
And by learning how to setup L2TP VPN on windows 8, you can speed up your internet connection and protect your device and get another IP every time using this service.
For Windows 7, check this link:
https://www.iwasel.com/en/faq/22/
How to setup L2TP VPN on Windows 8
Most of VPN services are paid services, so you need to buy an account first (note that: VPN service costs from 15$ to 35$, but the cheapest one is WASEL pro and IWASEL VPN service just costs me 10$ per month) you can use it.
Log in to your WASEL pro profile and then active your L2TP account and choose your server.
Open network and sharing center from ‘control panel’
Choose ‘setup a new connection or network
You will find this window, choose: connect to a work place, and then click ‘next’.
From this window, choose “use my internet connection”.
At “internet address” box enter WASEL pro server
Destination name: enter WASEL pro server you want to use again, and then click “create”.
Now click on this monitor icon.
Right click “WASEL pro VPN (L2Tp)”, then “properties”
Now choose: layer 2 tunneling protocol with IPsec (l2tp/ipsec)
From advanced sittings, enter “sharedsecret” in preshared key box, and then click ok.
Now tick on: allow this protocols, Microsoft CHAP version v2, and unencrypted password.
Then ok.
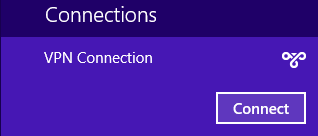
Now click on the monitor icon again, choose WASEL pro connection then click “connect”
Now enter your WASEL pro username and password then “ok”