DNS server addresses are usually provided by internet service providers to their customers and are configured automatically on their routers or modems. Giant ISPs run their own DNS server networks, in addition, there are a lot of free DNS servers on the internet that can be used as alternatives. Such servers come in handy during outages or to provide a more secure internet environment.
In this tutorial, we will show you how to change DNS servers on Windows 8 or 8.1. Scroll down for more details.
Steps for Changing DNS Servers on Windows 8
Below are the steps required to change DNS servers in Windows 8 or Windows 8.1. Make sure get an admin access before taking actions.
1- From your Start screen, type “Control Panel“, and then click on it to open the Control Panel.
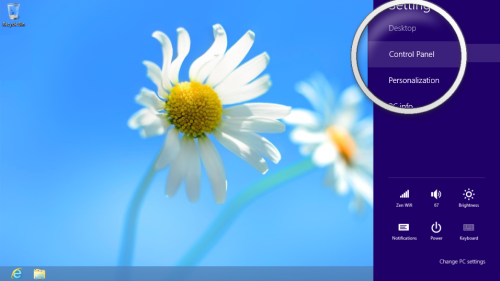
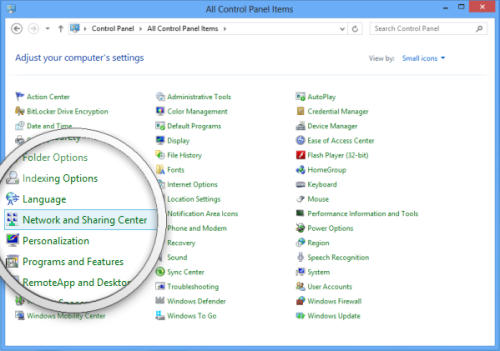
2- Select “Network and Internet” from the Control Panel. In some versions, you can select “Network and Sharing Centre” right away. If that is the case, then skip the nest step and click on “Network and Sharing Centre”.
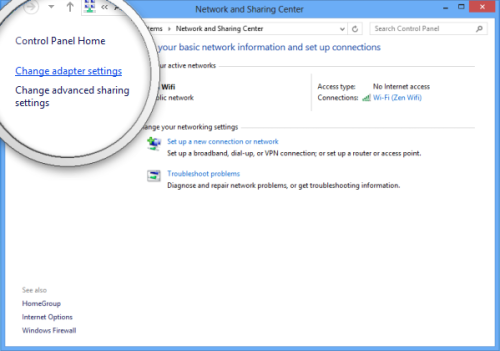
3- From the left panel, touch or click on “Change Adapter Settings“.
4- Upon clicking on “Change Adapter Settings”, you will be directed to a Network Connections window through which you can change DNS servers for the network connection you want. Unlike Windows 7, in Windows 8, wireless connections are identifies as “WiFi” whereas wired connections are identified as “Ethernet“. Some users may find more than just one connection . In order not to get confused, you can discard inactive connections as well as bluetooth connections. If you are still confused and unable to find your active internet connection, you can change the view of the items listed on that window to “Details” and select the connection which has “Internet Access” listed next to it in the “Connectivity” column.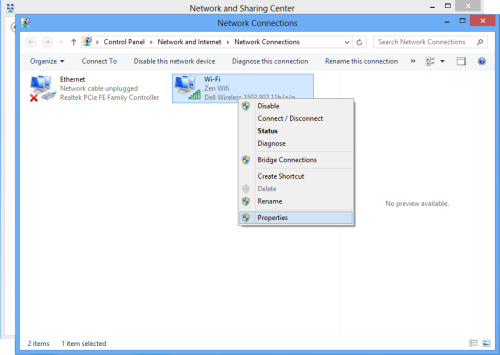
5- Tap twice or double-click on the internet connection you wish to change the DNS servers for.
6- Once you double-click on your internet connection, a new window will open at “Status” tab. Click or tap on Properties.
7- From the Properties window, scroll down till you reach Internet Protocol Version 4 (TCP/IPv4) and select it.
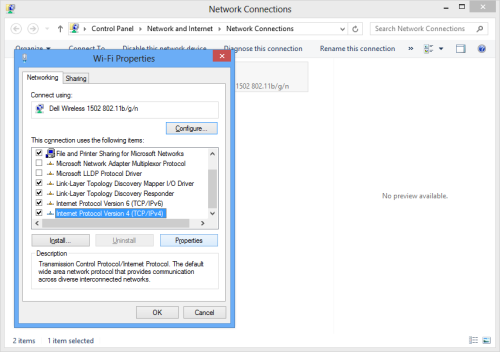
8- Click on “Properties“.
9- Select ” Use the following DNS server addresses” radio button. Note that some Windows 8 computers have custom DNS servers that are already configured by default. If that is the case, the radio button will be already checked.
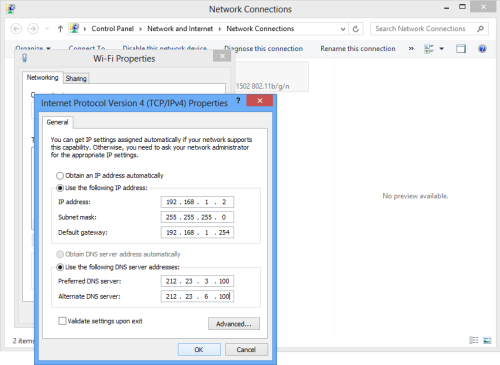
10- In this step, you can add IP addresses for the DNS servers you want in “Preferred DNS server” and “Alternate DNS server” fields. You can check our list of suggested DNS server addresses here.
11- Click or tap on “OK” to save your settings, and then close all open windows.
12- You can test your connection by visiting different websites. The speed should remain the same or become faster when you load pages.
Congratulations! You have successfully changed the DNS servers on your Windows 8/8.1.